Friday, December 7, 2012

Corset boning channels... AND puppy

As far as boning channels go and this corset, I'm planning to put them along each seam. It'll add a lot of interest with heavier contrasting thread as well as support.  I also decided to put a channel up under the breast so hopefully I won't have to deal with finding a bridal bra.  Corset and bra all in one!  At right sewing the channel and below the finished result.  I purposely only sewed this into the sandwiched layers.  I didn't want this tunnel and stitching to show up on the taffeta part of the corset.


Next, after basting the taffeta layer on top of the other two, time to sew all the remaining channels.  There are going to be 9 in all!

Darn! Something is wrong with my machine! After I'd sewn two channels the thread started totally bunching up on the back side and I almost broke a needle! Luckily I was using a practice piece of fabric when the machine went on the fritz. First thing in the morning off to find a sewing machine consultant!!! Booooo!


Noooooo! While I was busy sewing my puppy was busy making more work for me :( 


I was sure it was her and not my boxer, even though he was sleeping on top of the mess! She had feathers on her sweet little nose!


Side note and corsetry...

 Here's just a little side note... my good friend Y is making this super cool necklace for me!  I found a great store in Florence, Kix, that sells absolutely everything you could ever need to make your own jewelry. Y and I laid out this design a few days ago and now she's hard at work making it happen.  Soooo excited!
So now that the skirt is done and looking pretty good, it's time to start the corset.  This is gonna be sooo cool!  I first cut out and sewed up the inner liner which is actually two pieces sandwiched together.  These two pieces will hold the steel boning - great stuff!  This type of boning is flexible both front to back and side to side.  Also, it won't melt if it's dry-cleaned.


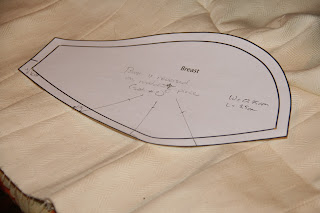
 Here's the two sandwich pieces laying on top of one another. In the picture to the left you can also see the breast pattern piece with the darts outlined.  Another confusing task for me - where to put the darts, what angle, how many, how long...  Ugh!  That was ALOT of trial and error.
Next, getting the two pieces to line up. What a pain in the A-- job it was to be 100% sure that the pieces were exactly matched up for the boning tunnels to be sewn.  This material is Really thick.  It's used for upholstery so it will hold up to any pulling stresses that are placed on the corset - that is the point of a corset, right?


After the two layers were basted together nicely I got up the courage to sew the taffeta corset. Very exciting! Then this was laid on top of the sandwich and again basted in place.  I think all the basting layers together took about 3 hours.  Very tedious work, but then the next step becomes much easier - sewing the boning channels.